via Engadget http://ift.tt/2dEV7vp
sabato 1 ottobre 2016
Komatsu's self-driving dump truck doesn't even have a cab
via Engadget http://ift.tt/2dEV7vp
Tutti pronti alla fusione Android - Chrome OS? Il 4 ottobre si avvicina
via DDay.it, news, articoli, guide, gallery e video http://ift.tt/2dm6Yvh
Tutto pronto per il lancio di Facebook At Work
via DDay.it, news, articoli, guide, gallery e video http://ift.tt/2drHIn7
venerdì 23 settembre 2016
domenica 18 settembre 2016
mercoledì 14 settembre 2016
giovedì 8 settembre 2016
mercoledì 31 agosto 2016
martedì 30 agosto 2016
Find out if Windows 10 is limiting your Internet speed
If you noticed an Internet speed drop after upgrading to the latest version of Windows 10, the following troubleshooting guide may help resolve it.
It may be particularly useful if the Internet speed was fine on previous versions of Windows, and is no longer after the upgrade to Windows 10 Anniversary Update edition.
Microsoft introduced a feature called Window Auto-Tuning back in Windows Vista, and has made it part of any newer version of Windows as well.
Set to on by default, it is designed to improve performance for programs that receive TCP data over a network.
While data transfers should be more efficient as a general rule, users may experience slower than usual data transfer speeds under certain conditions or even connectivity issues.

The first thing you may want to do is check the status of Window Auto-Tuning. If it is turned off for instance, it is likely that it is not the case for the slow downs, but if it is set, it may very well be the culprit.
Note: you don't need administrative privileges for running the command above, but you will need them for modifying the Window Auto-Tuning parameter.
You may want to disable the feature to run connection tests and see if it is the cause for the limited Internet speed that you are getting out of the connection.
Run the following command to disable Window Auto-Tuning on Windows 10:

Once disabled, start downloads just like before and monitor the speeds that you get. You may want to fire up a P2P client, Usenet program, FTP client or server program to find out if disabling Auto-Tuning Level did resolve the issue.
If it did not, you may want to turn it on again. This is done by running the following command:
If you want to know more about Window Auto-Tuning, check out the excellent analysis of the feature here.
Ghacks needs you. You can find out how to support us here or support the site directly by becoming a Patreon. Thank you for being a Ghacks reader.
The post Find out if Windows 10 is limiting your Internet speed appeared first on gHacks Technology News.
via gHacks technology news http://ift.tt/2aApdh1
It may be particularly useful if the Internet speed was fine on previous versions of Windows, and is no longer after the upgrade to Windows 10 Anniversary Update edition.
Microsoft introduced a feature called Window Auto-Tuning back in Windows Vista, and has made it part of any newer version of Windows as well.
Set to on by default, it is designed to improve performance for programs that receive TCP data over a network.
While data transfers should be more efficient as a general rule, users may experience slower than usual data transfer speeds under certain conditions or even connectivity issues.
Managing Window Auto-Tuning in Windows 10
The first thing you may want to do is check the status of Window Auto-Tuning. If it is turned off for instance, it is likely that it is not the case for the slow downs, but if it is set, it may very well be the culprit.
Note: you don't need administrative privileges for running the command above, but you will need them for modifying the Window Auto-Tuning parameter.
- Tap on the Windows-key, type cmd.exe, hold down Shift and Ctrl keys, and hit enter.
- Confirm the UAC prompt that opens.
- Run the command netsh interface tcp show global.
You may want to disable the feature to run connection tests and see if it is the cause for the limited Internet speed that you are getting out of the connection.
Run the following command to disable Window Auto-Tuning on Windows 10:
- netsh int tcp set global autotuninglevel=disabled
Once disabled, start downloads just like before and monitor the speeds that you get. You may want to fire up a P2P client, Usenet program, FTP client or server program to find out if disabling Auto-Tuning Level did resolve the issue.
If it did not, you may want to turn it on again. This is done by running the following command:
- netsh int tcp set global autotuninglevel=normal
If you want to know more about Window Auto-Tuning, check out the excellent analysis of the feature here.
Ghacks needs you. You can find out how to support us here or support the site directly by becoming a Patreon. Thank you for being a Ghacks reader.
The post Find out if Windows 10 is limiting your Internet speed appeared first on gHacks Technology News.
via gHacks technology news http://ift.tt/2aApdh1
StorDiag.exe: new Windows 10 Storage Diagnostic tool
StorDiag.exe is a new command line drive tool to analyze storage on devices running Windows 10 that Microsoft added silently to the Anniversary Update.
The program is a diagnostic tool that you may use to identify storage related issues. Issues that it may detect including corruption of the NTFS file system.
There is more to the program than that though. You may use it to run a an ETW trace as well, and check the logs, Registry files and event files StorDiag.exe creates when it is done with the processing.
The application runs several tools in the background for that, including CheckDisk, fsutil and fltmc.

The application can only be run from an elevated command prompt. Since it is only available in Windows 10's Anniversary Edition, instructions are only provided for this particular version of Windows.

First thing you need to do is open an elevated command prompt.

The program supports three parameters that you can run it with. You may run stordiag.exe /? first to display them on the screen.

You may run the application with all commands, or only some of them.
If you want to run them all, use the following command to do so:
stordiag.exe -collectEtw -checkFSConsistency -out c:\users\martin\desktop
Note: You need to change "martin" in the out path to the username on your system. You may also leave the -out path part. If you do, all logs are saved to a StorDiag folder on the system's temp folder. Simply copy and paste %TEMP%\StorDiag in the Explorer address bar and the location should open.
The processing takes a couple of minutes tops. It depends largely on the number of storage devices connected to the Windows 10 machine at the time.
The program will check all drives for corruption using CheckDisk, and will collect a 30 second ETW trace. It runs several tools in the background and logs their output.
You find the massive list of log files and event files in the -out directory afterwards.
CDROM.reg
ChkDsk C.txt
ChkDsk O.txt
ChkDsk P.txt
ChkDsk S.txt
ChkDsk T.txt
DiskDrive.reg
FileSystem.reg
HDC.reg
<DIR> LocaleMetaData
Microsoft-Windows-DataIntegrityScan-Admin.evtx
Microsoft-Windows-DataIntegrityScan-CrashRecovery.evtx
Microsoft-Windows-DiskDiagnostic.evtx
Microsoft-Windows-Ntfs.evtx
Microsoft-Windows-Partition.evtx
Microsoft-Windows-Storage-ATAPort.evtx
Microsoft-Windows-Storage-ClassPnp.evtx
Microsoft-Windows-Storage-Storport.evtx
Microsoft-Windows-StorageManagement-Operational.evtx
Microsoft-Windows-StorageSpaces-Driver-Diagnostic.evtx
Microsoft-Windows-StorageSpaces-Driver-Operational.evtx
Microsoft-Windows-StorageSpaces-SpaceManager-Operational.evtx
Microsoft-Windows-Volume.evtx
Microsoft-Windows-VolumeSnapshot-Driver.evtx
perflog.etl
PSLogs.txt
SCSIAdapter.reg
System.evtx
VolMgr.reg
VolSnap.reg
Volume C Corruption.txt
Volume O Corruption.txt
Volume P Corruption.txt
Volume S Corruption.txt
Volume T Corruption.txt
Volume.reg
The CheckDisk information about each drive and potential corruption are probably most useful to users of the operating system.
System administrators find lots of information in the other files that they may use to analyze storage related issues.
StorDiag.exe does not resolve any of the issues that it may report. It is up to you or the system administrator to correct those.
Ghacks needs you. You can find out how to support us here or support the site directly by becoming a Patreon. Thank you for being a Ghacks reader.
The post StorDiag.exe: new Windows 10 Storage Diagnostic tool appeared first on gHacks Technology News.
via gHacks technology news http://ift.tt/2btdYss
The program is a diagnostic tool that you may use to identify storage related issues. Issues that it may detect including corruption of the NTFS file system.
There is more to the program than that though. You may use it to run a an ETW trace as well, and check the logs, Registry files and event files StorDiag.exe creates when it is done with the processing.
The application runs several tools in the background for that, including CheckDisk, fsutil and fltmc.
Using StorDiag.exe
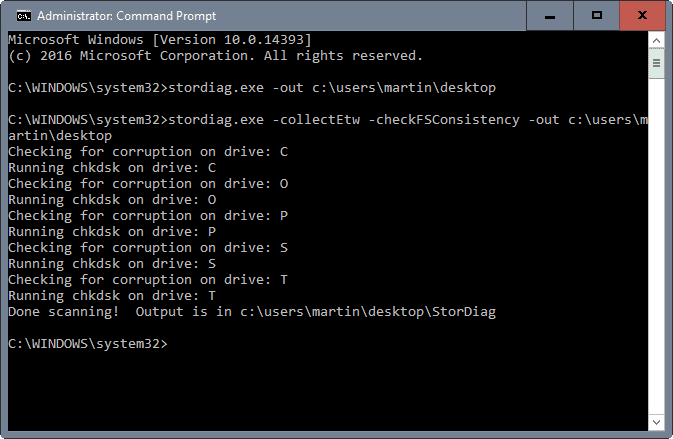
The application can only be run from an elevated command prompt. Since it is only available in Windows 10's Anniversary Edition, instructions are only provided for this particular version of Windows.
Step 1: Open an elevated command prompt
First thing you need to do is open an elevated command prompt.
- Tap on the Windows-key, type cmd.exe, hold down the Ctrl and Shift keys, and hammer on the Return key.
- Confirm the UAC prompt that is displayed afterwards.
- The elevated command prompt window should open. If it reads Administrator in the title, all is well.
Step 2: The command
The program supports three parameters that you can run it with. You may run stordiag.exe /? first to display them on the screen.
StorDiag [-collectEtw] [-out <PATH>]
-collectEtw Collect a 30-second long ETW trace if run from an elevated session
-checkFSConsistency Checks for the consistency of the NTFS file system
-out <PATH> Specify the output path. If not specified, logs are saved to %TEMP%\StorDiagStep 3: Running storage diagnostics
You may run the application with all commands, or only some of them.
If you want to run them all, use the following command to do so:
stordiag.exe -collectEtw -checkFSConsistency -out c:\users\martin\desktop
Note: You need to change "martin" in the out path to the username on your system. You may also leave the -out path part. If you do, all logs are saved to a StorDiag folder on the system's temp folder. Simply copy and paste %TEMP%\StorDiag in the Explorer address bar and the location should open.
The processing takes a couple of minutes tops. It depends largely on the number of storage devices connected to the Windows 10 machine at the time.
The program will check all drives for corruption using CheckDisk, and will collect a 30 second ETW trace. It runs several tools in the background and logs their output.
You find the massive list of log files and event files in the -out directory afterwards.
CDROM.reg
ChkDsk C.txt
ChkDsk O.txt
ChkDsk P.txt
ChkDsk S.txt
ChkDsk T.txt
DiskDrive.reg
FileSystem.reg
HDC.reg
<DIR> LocaleMetaData
Microsoft-Windows-DataIntegrityScan-Admin.evtx
Microsoft-Windows-DataIntegrityScan-CrashRecovery.evtx
Microsoft-Windows-DiskDiagnostic.evtx
Microsoft-Windows-Ntfs.evtx
Microsoft-Windows-Partition.evtx
Microsoft-Windows-Storage-ATAPort.evtx
Microsoft-Windows-Storage-ClassPnp.evtx
Microsoft-Windows-Storage-Storport.evtx
Microsoft-Windows-StorageManagement-Operational.evtx
Microsoft-Windows-StorageSpaces-Driver-Diagnostic.evtx
Microsoft-Windows-StorageSpaces-Driver-Operational.evtx
Microsoft-Windows-StorageSpaces-SpaceManager-Operational.evtx
Microsoft-Windows-Volume.evtx
Microsoft-Windows-VolumeSnapshot-Driver.evtx
perflog.etl
PSLogs.txt
SCSIAdapter.reg
System.evtx
VolMgr.reg
VolSnap.reg
Volume C Corruption.txt
Volume O Corruption.txt
Volume P Corruption.txt
Volume S Corruption.txt
Volume T Corruption.txt
Volume.reg
The CheckDisk information about each drive and potential corruption are probably most useful to users of the operating system.
System administrators find lots of information in the other files that they may use to analyze storage related issues.
StorDiag.exe does not resolve any of the issues that it may report. It is up to you or the system administrator to correct those.
Ghacks needs you. You can find out how to support us here or support the site directly by becoming a Patreon. Thank you for being a Ghacks reader.
The post StorDiag.exe: new Windows 10 Storage Diagnostic tool appeared first on gHacks Technology News.
via gHacks technology news http://ift.tt/2btdYss
Iscriviti a:
Post (Atom)
Discover Last30Days-Skill: The AI Search That Reads the Reality of the Last 30 Days!
🚀 🤖 💻 ⚡ 🎯 🧠 🔧 📦 🐍 📊 🏆 🔗 ⭐ 👉 LAST 30 DAYS SKILL: YOUR ULTIMATE AI SEARCH! Have you ever wanted to know what is really happeni...
-
Browserleaks.com , un sito web che offre una serie di strumenti gratuiti per testare la sicurezza e la privacy del vostro browser. Funziona...
-
Forse non lo sapevi, ma LinkedIn utilizza parte delle tue informazioni per migliorare i propri sistemi di intelligenza artificiale. Se pre...
-
HopToDesk si presenta come un'ottima soluzione di desktop remoto gratuita e open source, adatta sia per uso personale che commerciale. ...